Wednesday 16 March 2011

Import Muxed MPEG-1/ MPEG-2 into iMovie by Converting MPEG to iMovie Compatible Format

Importing MPEG to iMovie (including iMovie '11/'09/'08), only to find MPEG files are grayed out. Recently, Many Mac users have come across such a problem. Usually, iMovie does allow the import of MPEG files. However, if MPEG (MPG) files are muxed (multiplexed) MPEG-1 or MPEG-2 video, iMovie will refuse to import the MPEG (MPG) files. Then you need to use some converter software to convert MPEG to iMovie compatible format for use in your iMovie project.

This article will show you how to convert MPEG to iMovie compatible format so as to successfully import MPEG into iMovie, import MPG to iMovie.

Make Preparation
Free download Bigasoft iMovie Converter for Mac install and run it.

Screenshot of Bigasoft iMovie Converter for Mac
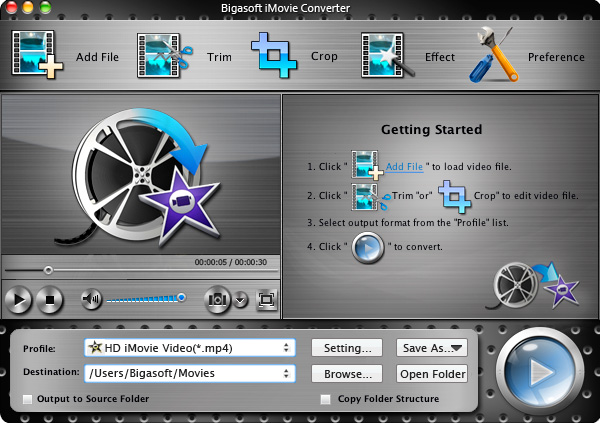
Step 1 Add MPEG (MPG) files to Bigasoft MPEG to iMovie Converter for Mac
Click the "Add File" button to import your MPEG (MPG) files. This MPEG to iMovie converter supports batch conversion, so you can also import multiple files at a time.


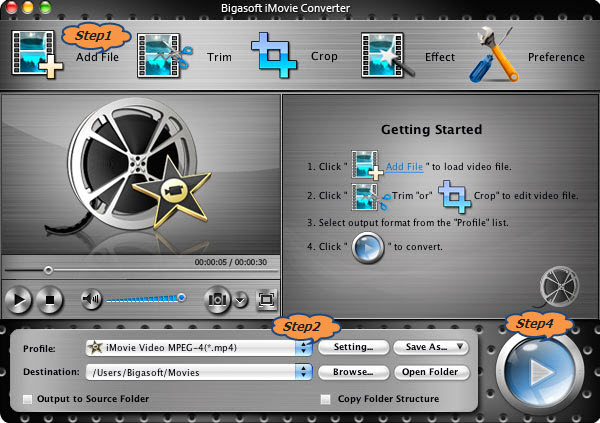
Step 2 Choose output format compatible with iMovie
Click the drop-down button on the right side of the "Profile" button to select iMovie compatible format like iMovie Video MPEG-4 Movie (.mp4). If you want the best quality for the output MP4 video, you can choose iMovie HD Video MPEG-4 Movie (.mp4) from the drop-down button.

Step 3 Customize (Optional)

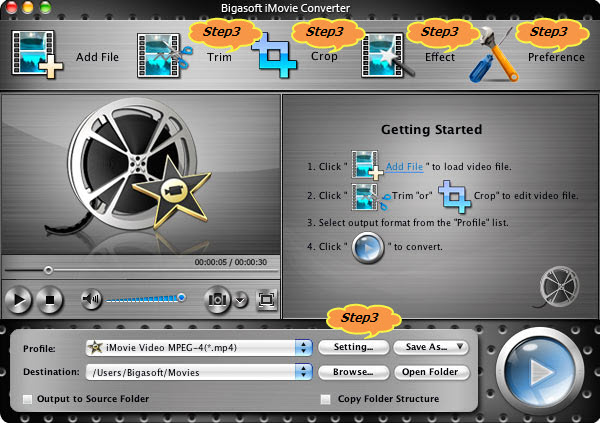
Click "Trim" button, you can achieve converting only your wanted clips by setting the start time and the end time.
Click "Crop" button, you can cut off the black edges of the original movie video.
Click "Preference" button, you can finish setting output effects, image type, CPU usage and action after conversion done, etc as you like.
Click "Settings" button, you can set parameters of your output files such as frame rate, resolution, channels, sample rate, video/audio codec, video/audio bitrates, etc.
You can also join several chapters into one by checking "Merge into one file" box.

Step 4 Start to convert MPEG to iMovie compatible format
Click the "Start" button, and then your MPEG (MPG) files will be converted to iMovie compatible format soon!

Step 5 Import MPEG to iMovie
Run iMovie, then click "File -> Import Movies..." to upload the converted MPEG into iMovie.
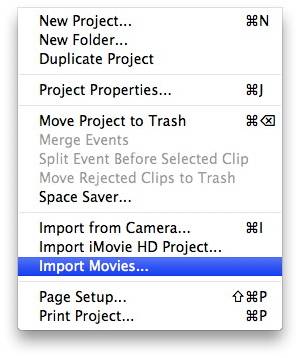
Tips
  • What is MPEG?
    • MPEG, short for Moving Picture Experts Group, is a working group of experts that was formed by ISO and IEC to set standards for audio and video compression and transmission. The term also refers to the family of digital video compression standards and file formats developed by the group. And the major MPEG standards include MPEG-1, MPEG-2, MPEG-3, MPEG-4, MPEG-7 and MPEG-12.
    •  
  • Why iMovie refuses to import muxed MPEG-1 or MPEG-2 video clips?
    • According to Apple support, when files are muxed, they contain interleaved audio and video tracks (they're mixed together instead of stored in separate tracks). Because of this, iMovie cannot support them. Check for more info: http://support.apple.com/kb/HT1372.
  • How to find if a MPEG file is muxed?
    • Open the original movie file in QuickTime Player.
    • From the Window menu, chose Show Movie Inspector.
    • Note the entry next to "Format".
  • What is iMovie?
    • iMovie is a proprietary video editing software application which allows users to edit their own home movies. As soon as you own an iMovie, you can edit and make your videos at will. And then publish them to your own iTunes Library, YouTube or MySpace. However, iMovie is only available with few video formats including DV, DV Widescreen, HDV, MPEG-4, iSight. If you want to edit your other video formats, you need to convert them to iMovie compatible formats.
It is so easy to import MPEG to iMovie (including iMovie '11/'09/'08) so long as you own Bigasoft iMovie Converter for Mac! Why wait, just free download it and have a try!

Resources

Sunday 6 March 2011

Load Mini DVD to Mac and Import Mini DVD into iMovie

Compared with tape-based (Mini DV/HDV) camcorders, Mini DVD camcorders have gain more popularity in its convenience. Footage from Mini DVD camcorders can be dropped into and played on a DVD player. However, when try to import Mini DVD into iMovie; you will fall into headache situations. One who owns Mini DVD camcorder like Sony DCR-DVD92, Sony Handycam, Canon DC20, Panasonic VDR, had better read this article.


The headache situations you will come across when try to import Mini DVD into iMovie.
  • Situation 1: For iMovie runs on Mac. So if you want to import Mini DVD into iMovie, the first thing you need to do is to load Mini DVD to Mac. A Mini DVD can be played back in most DVD players that are tray loaded. Most slot loading players cannot use this format expect the PlayStation 3 and the Wii. However, DVD players on Mac are slot loading. So problems come out when you load Mini DVD through slot loading players.
  • Situation 2: Since Mac slot loading DVD players can not load Mini DVD, you had better try to connect the Mini DVD camcorder to Mac using FireWire, or USB if it has one. This time your Mac does recognize the footage, but iMovie will not. Though iMovie 08/09 is said to work with MPEG-2 which is used to record DVDs and Mini DVDs, as many people indicated that iMovie 08/09 is just said than done. So when try to import Mini DVD into iMovie, you will fail in the end in most situation.
  • Situation 3: Neither Mac slot loading DVD players can load Mini DVD, nor Mini DVD camcorder has a FireWire or USB output to connect with Mac. Shop for separate external drive or full-size adapter also can helps to insert Mini DVD to Mac. But iMovie still refuse to import Mini DVD.
No more worried about it! Any situation becomes so easy to solve so long as your own Bigasoft DVD to iMovie Converter for Mac.
 
After successfully loading a Mini DVD into Mac in whatever situation above, we encountered another headache situation that is iMovie refuses to import Mini DVD. So what could we do this time? It is just a piece of cake so long as you own Bigasoft DVD to iMovie Converter for Mac.

Bigasoft DVD to iMovie Converter for Mac assists you to convert DVD discs/Mini DVD to iMovie compatible format. It can convert Mini DVD to iMovie MPEG-4 video (.mp4), iMovie HD Video MPEG-4 (.mp4), QuickTime MOV, MP3, AAC, M4A and WAV with high speed and great quality.

The following is a step by step guide on how to import Mini DVD into iMovie with the help of Bigasoft DVD to iMovie Converter for Mac.

Firstly, FREE Download Bigasoft DVD to iMovie Converter for Mac, install and run it. Then, the following main interface will pop up.

Screenshot of Bigasoft DVD to iMovie Converter for Mac
 
Step 1 Load Mini DVD to the DVD to iMovie Converter Software
At first, load Mini DVD to Mac. Then look at the main DVD to iMovie converter interface, click "Open DVD" button to choose "Open DVD" or "Open DVD Folder" to load Mini DVD file. Or simply drag and drop Mini DVD file to Bigasoft DVD to iMovie Converter for Mac.

Step 2 Set output profile as iMovie Video MPEG-4
Click the down list button on the right side of the "Profile" button to set the output format as iMovie Video MPEG-4(*.mp4).

Step 3 Finish to convert Mini DVD to iMovie supported format
Click the "Start" button to finish converting Mini DVD to iMovie supported MP4 format.


Step 4 Import Mini DVD to iMovie
Run iMovie, and then click "File -> Import Movies..." to upload the converted Mini DVD to iMovie.

step by step guide on how to import Mini DVD into iMovie
 
Tips
  • What is Mini DVD?
    • Mini DVD (MiniDVD or miniDVD) is a DVD disc having 8 cm in diameter. It is on a CD-R(W) instead of a DVD disc. A MiniDVD can be played back in most DVD players that are tray loaded. Most slot loading players like Mac DVD drive cannot play Mini DVD except the PlayStation 3 and the Wii. Directly putting mini-DVD into the DVD drive on Mac without a full-size adapter will make Mac get stuck or even completely ruin DVD drive. Mini DVD has become one of the most frequently used mediums particularly with camcorder recordings for its outstanding advantages, including random access (you can make a play-list in edit/play mode in your camcorder), immediate playwrite/rewrite (you can immediately view your recordings with your camcorder), elimination of blank search, short of finalization time, production, one-stop production solution etc. And MPEG-2 is the format used to record Mini DVD.
  • How to load Mini DVD to Mac
    • Though Mini DVD can not be played back in Mac slot loading player, we have other ways to load Mini DVD to Mac.
    • Method 1 If Mini DVD camcorder has FireWire or USB; just connect the Mini DVD camcorder to Mac using FireWire, or USB to load Mini DVD to Mac.
    • Method 2 If Mini DVD camcorder has not FireWire or USB; just shop for external mini-DVD drive that uses either a USB or Firewire connector cable, and then connect the external mini-DVD drive to your Mac and install any extra software that came with it. Insert the mini-DVD into the external drive, and then access the files on the mini-DVD as you normally would to load Mini DVD to Mac.
    • Method 3 If Mini DVD camcorder has not FireWire or USB; buy an adapter that converts a mini-DVD to a normal DVD by adding on a circular plastic piece that emulates the full size of a regular DVD. Attach the adapter to the mini-DVD and load it into the Mac's DVD drive to access the files. (Check the specifications of the adapter before purchasing, as several on the market do not work in vertical-loading drives like those found on the MacBook Pro.)
    • Method 4 If Mini DVD camcorder has not FireWire or USB and you don't want to buy a separate external drive or full-size adapter either, but you do have access to a PC, you can transfer the files on the mini-DVD onto the PC, then put them onto a USB flash drive, which will work on your Mac.
With this ideal DVD to iMovie Converter, just enjoy editing Mini DVD with iMovie '08/'09/'11!

Resources

Tuesday 1 March 2011

Practical Solution to Download and Import YouTube to iMovie

YouTube offers an easy way to share videos with family and friends online. But the videos are imprisoned on the web with no way to save the videos to a user's computer hard drive. Even if we have downloaded videos from YouTube, it is still difficult to import the downloaded YouTube videos to iMovie for editing.
In fact, it is that easy to download YouTube to iMovie, convert YouTube to iMovie and import YouTube to iMovie as soon as you own Bigasoft YouTube to iMovie Converter. As the professional YouTube to iMovie Downloader and Converter, it can easily download all kinds of YouTube videos in FLV, MP4, and WebM as well as convert them to iMovie compatible video formats for importing YouTube videos to iMovie successfully.

The following is a step by step guide on how to download and import YouTube to iMovie with the help of Bigasoft YouTube to iMovie Converter.

Make Preparation: Run Bigasoft YouTube to iMovie Converter
Free download Bigasoft YouTube to iMovie Converter, install and run it, the following interface will pop up.
YouTube to iMovie Converter

Step 1 Add YouTube video
If you have already downloaded YouTube video:
  • Click "Add File" button to import your downloaded YouTube video to this YouTube to iMovie Converter.
If you have not downloaded YouTube video yet:
  • Click the small triangle to the right of "Add File", a drop down menu will pop up; select "Add YouTube Video..." to paste the YouTube URL and then click "OK" button, this YouTube to iMovie Converter will fast download YouTube video of the highest resolution maximally1080p YouTube video and the downloaded video will automatically appear in the main window of Bigasoft YouTube to iMovie Converter.
Convert and Import YouTube to iMovie

Step 2 Set output profile as iMovie Video MPEG-4
Click the drop-down button on the right side of the "Profile" button to select iMovie compatible format like iMovie Video MPEG-4 Movie (.mp4).

Step 3 Convert YouTube to iMovie compatible MPEG-4 format
Click the "Start" button to finish converting YouTube FLV to iMovie compatible MPEG-4 format.

Step 4 Import YouTube to iMovie
Run iMovie, and then click "File -> Import -> Movies..." to import the converted YouTube video to iMovie.
Import YouTube to iMovie
Tips
If you are using Apple's Safari browser, you can also achieve downloading YouTube FLV to your computer with the following way. And then refer to the above step by step guide on how to import YouTube to iMovie.
  • Step 1 Open Safari browser and point it to the YouTube website. Next, search for the video that you wish to download and when it comes up in the search results click it. The video will begin playing.
  • Step 2 Pause the video, and go to the Window menu, then click on "Activity". Tips: You can also achieve opening "Activity" window by pressing the following key combination on your Mac's keyboard: Command-Option-A. The "Command" key may say the word "Command" or it may simply have an Apple symbol depending on the model of your keyboard.
  • Step 3 In "Activity" window, you will see what currently is running in Safari. In that, you would also see the YouTube video link with a list of files under it. Select the highest size file in it.
  • Step 4 Double click on the selected file and the browser will begin downloading. When the downloading is finished, go to "Finder" -> "Macintosh HD" -> "Users" -> "Home folder" -> "Downloads" to locate the files you just download. It will be named like "videoplayback-000". If you want to reset "Download" folder, go to "Safari Preference". Click on the "General" tab at the top. You will see a 'Save downloaded files to:' drop down menu where you can select where to place downloaded files when using Safari.

Resources
FREE Download and Start Enjoying Now (28.12MB)
Learn more about Bigasoft YouTube to iMovie Converter ...
Related Articles
How to Download, Convert and Transfer YouTube to iTunes?
How to import MP4 to iMovie